Friday, December 21, 2018

New Products, Awesome Joining Offer, and an Easel Calendar Tutorial

Hi Crafty Friends!
It's almost Christmas and I may have put away the Christmas stamps for the season (maybe??).

So as all good crafters do, we want to know what's next and we're ready to play with new stuff. What's next is the upcoming 2019 Stampin' Up! Occasions catalog and Sale-A-Bration.


It's time for a new catalog full of awesome products and a great joining offer, as well as free stuff!
I'll have catalogs at all my events this month. You can also arrange to pick one up, and if you live farther from me, I'll mail you one. Let me know, I want to share all the great new stuff with you.

Our Sale-A-Bration (or SAB) is a great time to enhance you craft stash. Starting January 3rd until March 31, with each $50 spent, you can earn free product! You can also get lots of free product by joining my Crafty Corner Design Team ($99 plus tax to join $175 in product plus free shipping and a business kit!), or by hosting a party (book parties or Facebook parties too) or a class, at your place or mine. So many ways to get free stuff. I love SAB!


I'll be sharing lots over the next few weeks about all of the SAB offers. For the quickest and most up to date info, follow me on FaceBook or on Instagram (audra monk).

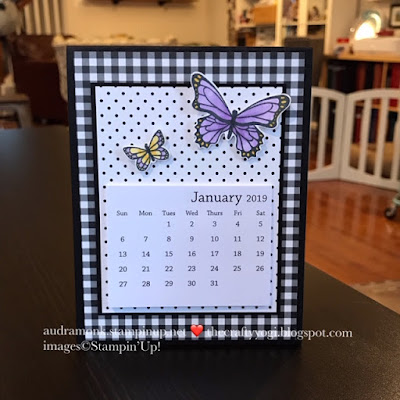
Let's take a look at some lovely new products and, I have a video tutorial.


We made this project at our team meeting this week. We got together for dinner, chatting, and crafting. It's so fun finding a group of people who love to craft as much as I do. For those that couldn't make the meeting, I'll have their projects and gifts ready for pick up or to be mailed. We're always looking for more crafty friends to join the team! I'm happy to answer any questions you have. I even have an joining info video on my YouTube channel! You can see it HERE


 Here's a closer look at the paper and stamp set. The project uses the Butterfly Gala Bundle (stamp set and punch) and the free Botanical Butterfly DSP.

And now, for the video tutorial on making the easel calendar. 
Measurements and supplies needed:
Card stock, 4 1/4" x 11", score at 5 1/2"
Easel base card stock, 3 1/2" x 4 1/4", score at 1/2", 1 3/4", and 3"
DSP, 4" x 5 1/4"
Card stock, 3 1/8" x 4 1/8"
DSP, 3" x 4"
3" x 4" mini calendars. I got them from HERE. (tayloredexpressions.com)
Have a great time making one!


Here are a few of us at the end of our team meeting. I'm still not the greatest selfie taker, but I sure am super thankful to hang out with these nice ladies.


And Lissa the dog loves to see them too.


Thanks so much for stopping by my blog today.
Happy Crafting!
Audra


Wednesday, December 5, 2018

Christmas Cards Galore! ICS Blog Hop

It's the first Wednesday of the month and time for the ICS Blog Hop.


Today we're sharing Christmas Cards. And I am going to share a bunch! Last weekend I had a class at The Frederick Inn Bed and Breakfast. It's a lovely location, and it was all decorated for Christmas. I designed (with help from the catalog, our Demo group, and a sketch challenge) 5 cards that show off a range of styles and used a variety of sets. Let's have a look at the Inn and my cards.


Isn't the Inn lovely? 
Let's take a look at the cards now:

So Santa stamp set with Tropical Escape DSP. Stamped in Momento Ink and colored with our Stampin' Blends.

Alpine Sports Thinlits and the Softly Falling Embossing Folder.
Tip: Use our adhesive sheets to make your sled a sticker! Add the adhesive paper to the card stock, then die cut.

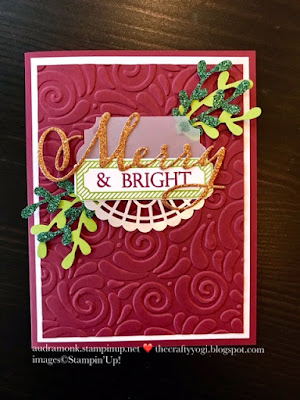
 Merry Christmas to All bundle and the Swirls & Curls Embossing Folder. Plus the super awesome Sprig Punch. I used the Adhesive Sheets for the die cut words too.

The Warm Hearted stamp set (host stamp set) and the Festive Farmhouse DSP. This is one of my favorite card designs, such a quick and fun way to make any kind of card.

The Making Christmas Bright bundle and Santa's Workshop DSP. Plus Chalk Marker and Wink of Stella on the light bulbs.

I had a really great time sharing card making with new crafters and old friends. You should definitely plan a craft day with friends.


There were cookies, of course.

I love how all of the wonderful products from Stampin' Up can help us make lovely projects.

Thanks so much for stopping by my blog today. Have a great time going through the entire hop. I know that you will be inspired to make some of your own Christmas cards.
Start HERE (or the next button below) to see what my good friend Megan has to share.


We've got a lot going on at Stampin' Up! We're on the last month of our Holiday catalog and the Year End Closeout has started. Select products are on sale, while supplies last. So shop soon for the best selection. Click HERE to check it out.

Need help? Card design or products, let me know.
Happy Crafting!
Audra


Monday, November 19, 2018

What is a Class to Go?

Hi Crafty Friends!
Today's blog post is an informational post explaining how my Classes to Go work.

Each month, I plan to offer a Class to Go. I will select a stamp set or bundle, (stamp set with framelits or punch) design some projects (usually cards) and come up with purchase options. Then I'll do a blog post that explains that month's options. Pre-payment is necessary, by PayPal or in person. If you are not local to me, there will be an additional charge for shipping your kit to you. There will be a set closing date. Then I will order the products, prepare the card kits, make the PDF and the video tutorial.

Let's take a look at this past month's class. I have a short video.  
Then see the descriptions and  pics below.


November's class featured our limited edition Snowflake Showcase (still available till the end of November or as supplies last). 


I shared the projects that would come in the kit and the options for products needed to complete the projects at home.

Once the orders were received and the due date passed, I ordered each person's products from Stampin' Up. Then I prepared the card kits.

This is what the complete kit looked like, plus two free pieces, 6" x 6" of the White Velvet Paper. There is usually some kind of freebie in the kit. Each kit includes the pre-cut paper and die cuts, as well as any embellishments.


Then I make them into packets.


And then package them up for local pick up or into a priority envelope to be mailed.


You then get an email from me with a PDF that has measurements and basic assembly directions, as well as a link to a private video so that you can stamp and complete your projects at home. You'll need blocks, ink, adhesive, and sometimes a Big Shot. 
Extra product can always be added to your kit if desired.

Once the due date has passed, the only part of the Class to Go that remains available is the option of just the PDF and video link. Most times you can still order the stamps and other supplies from my website. So if you really like the projects, you can still make them!

These classes are exclusively to go. We will not make them at my in studio classes. I offer discounted options for my team members.

I hope this post has answered your questions. If not, let me know. Feel free to take a look at previous month's classes. And stay tuned for the upcoming classes.

Happy Crafting!
Audra


Saturday, November 3, 2018

So Santa, Tropical Christmas Card

Hi Crafty Friends!

I've been working on card designs for an upcoming class at The Frederick Inn Bed and Breakfast. The class is on Sunday December 2, so save the date as I'll have more info soon.

I like to offer a variety of cards and as I got to the last one, I really wanted something fun and not too traditionally Christmasy. I decided to use the beach Santa from the So Santa stamp set.
 I turned to the Freshly Made Sketches sketch to help me make the card.


Isn't it adorable?!? I used our Tropical Escape DSP to brighten the scene. I love how crisp and clean the card looks with the black and white. I stamped the Santa in Momento ink and then colored him with Stampin' Blends. I stamped the sentiment in Versamark and then heat embossed.

Here's the sketch I used:

And my card again:

You can find out more about Freshly Made Sketches and their challenges here: http://freshlymadesketches.blogspot.com

Thanks for stopping by! Need help purchasing, let me know. 

Happy Crafting!
Audra


Thursday, November 1, 2018

Snowflake Showcase, ICS Blog Hop

Hi Crafty Friends!
It's ICS Blog Hop time. We usually do this blog hop the first Wednesday of the month, BUT it's coming early as lots of us will be in Orlando celebrating 30 years of Stampin' Up next week. I'm so excited to go celebrate, catch up with other demos, be inspired, see new product, and squeeze in a few short visits at Disney World. But I digress...let's get on to the creative inspiration!


We're celebrating Christmas on this blog hop.
I'm showcasing our limited edition Snowflake Showcase. (Haha, see what I did there). Starting November 1, you can order from this lovely suite.


It's such a fun set. The card I'm sharing is all about Christmas!


Isn't this the most Christmacy Christmas card? The DSP is in our annual catalog, it's called Under the Mistletoe. I stamped the snowflake tree in Old Olive and the greeting in Real Red.

I just love the snow flurry die cut.  I attached the tree and snow flurries with our Mini Glue Dots.
I love this set, there's a lot that can be done with it. 
(In fact I've made it my November Class to Go, see link at the end of this post).

For more Christmas inspiration, click HERE or the arrow below to see what Shirley has to share.


Here's all the info on the Snowflake Showcase:


See more projects from the Snowflake Showcase and get info on my Class to Go, here.
Need help shopping or crafting, contact me, I'm happy to help.

Stay Crafty!
Audra


Monday, October 29, 2018

Late Fall Sampler

Hi Crafty Friends!
November is quickly approaching and we made this lovely bright sampler to have on display all month. I had a lot of fun with the bright colors and I'll tell you straight up, it's a lot of coloring.


Measurements:

Early Espresso, 9"x 9"
Crumb Cake, 8 1/4"x8 1/4"
Big Square:
Early Espresso, 4 7/8"x4 7/8", Pumpkin Pie, 4 3/4"x 4 3/4", Country Home DSP, 4 1/2"x 4 1/2", Crumb Cake, 3 7/8"x 3 7/8", Whisper White (for stamping) 3 7/8"x 3 7/8"
Rectangle:
Early Espresso, 2 3/8"x4 7/8", Pumpkin Pie, 2 1/4" x 4 3/4", DSP, 2"x4 1/2"
3 Small Squares:
Early Espresso, 2 3/8" x 2 3/8", Pumpkin Pie, 2 1/4" x 2 1/4", DSP, 2"x2"


Let's take a closer look.


 The top three squares feature the Falling for Leaves bundle. The outside leaves are stamped in Stazon ink and colored with our Blender Pens. I used Pumpkin Pie, Crushed Curry, and Blackberry Bliss. They are accented by our Galvanized Buttons. The center leaf is from the dies. The sentiment is from the same stamp set and it's stamped in Blackberry Bliss.


These pheasants are from the Pleasant Pheasant stamp set (wasn't that fun to say). I freely admit I know nothing about what color pheasants are. I saw a card from another demo (Joanne Hodge) and liked the way she colored the pheasants so I modeled mine after hers. I stamped them in Momento ink on Whisper White and used our Stampin' Blends to color them.


This might be my favorite section on the sampler. I love this Country Home stamp set. I stamped the milk jug in Stazon ink on the new Galvanized paper. The flowers and label are stamped in Momento in Whisper White and colored with the Stampin' Blends. There are no dies coordinated to the stamp set, so I cut everything out with my handy dandy snips.


I used a 9"x9" shadow box frame. I get them from Michael's or Ikea.

I think I've covered everything. If you need more specifics or have any questions, let me know. Want to order supplies to make one? Contact me or shop my website: audramonk.stampinup.net.

Thanks so much for checking out my blog today. Want to see more projects? Check out my Facebook page, https://www.facebook.com/TheCraftyYogicards/.

Stay Crafty!
Audra


Saturday, October 27, 2018

November's Class to Go

Hi Crafty Friends!
November is coming, and with it a Limited Edition suite, The Snowflake Showcase.
And this suite is November's Class to Go!


It's a great suite, two stamp sets, a framelit set, snowflake trinkets and white velvet sheets.
As you can see, there's lots to love. So check out the Class to Go options and contact me to order quick! RSVP with payment due by Nov 5. 
Email me at audramonk@yahoo.com to order. I'll place the orders on the 6th and prepare your card kits and have everything ready for pick up or mail (additional charge to mail) by the 19th. 


Option 1, $87

Snow is Glistening stamp set, Snowfall Thinlits Dies, 1/4 pack Snowflake Trinkets, AND the card kit to make TWO each of the cards pictured, plus a PDF with measurements and assembly instructions and a video tutorial link, AND 2 free 6x6 pieces of the White Velvet Sheets.
Recommended inks: Shaded Spruce, Real Red, Balmy Blue, Merry Merlot, Versamark.

Option 1 plus Embossing pack, $124

The big snowflake card is heat embossed. Some of you might need the tools to make this card. 
The embossing pack includes a Versamark Inkpad, White Embossing Powder, and our Heat Tool. With this option ($44 value) your card kit is FREE.


Option 2, $107

All listed above in Option 1, plus the Happiness Surrounds stamp set and a FREE card kit of supplies to make 2 of the additional card shown. Recommended ink: Rich Razzleberry and Pear Pizzaz.

Option 4, $144

The got to have it all option. This option includes Option 1 plus the Embossing pack and the Happiness Surrounds stamp set. The card kit for all 4 cards is now FREE, plus you get a FREE sheet of Stampin' Dimensionals.


Option 5, $25

Already have the suite? This option gets you the card kit plus the PDF and video tutorial link.


Option 6, $20

This option is for members of my team. It includes the card kits for all 4 cards (2 of each) plus the PDF and video link.


Option 7, $10

Just the PDF and video link.

***Shipping is additional***
Porch pick up is free.

Here is a video from Stampin' Up all about the Snowflake Showcase:

Thanks so much for checking out my blog today. 
Email me at audramonk@yahoo.com to order your Class to Go.

Stay Crafty!
Audra


Wednesday, October 3, 2018

All For Fall, ICS Blog Hop Featuring Country Home

Hi Crafty Friends!
It's the first Wednesday of the month, which means it's ICS Blog Hop time.  And it's October! One of the best month's of the year. Here in Maryland, the weather is thinking about cooling down, the leaves are starting to turn, and there is pumpkin everything, everywhere.


Today I'm sharing a card made with the Country Home stamp set from our Holiday catalog. I love this set, but this is the first time I've inked it up!

And I had a good time doing so. I used the Stamparatus to help me line the two parts up just right. And then I had a good time coloring the image with my Stampin' Blends.

I think it's a great set for almost any card and it has some lovely sentiments too. 
Stampin' Blends: 
Cajun Craze, Bermuda Bay, Soft Suede, Crumb Cake, and Smoky Slate.
I also used the new Buffalo Plaid stamp set for the background.
Thanks so much for stopping by my blog! For more inspiration, click HERE or the arrow below to see what Ginger has to share.


Want to order the Country Home stamp set or Stampin' Blends? Need more info on the Stamparatus? Contact me!
Stay Crafty!
Audra


Tuesday, October 2, 2018

A Hometown Christmas Framed Art Sampler

Hi Crafty Friends!
I am really enjoying all the Halloween and Fall projects that I've been working on, but you know I love Christmas projects. If you're making a handmade Christmas, you do need to start working kind of early so that you can have fun getting things done. So, so that you have time to order supplies and get to work, I'm sharing my Christmas Sampler early.


Oh Stampin' Up! you have done such a good job with your Holiday catalog this year. Isn't this piece just lovely? I mean, I love it but I hope you do too. Here are the measurements and then we'll get to the details. And for fun, I even made an assembly time lapse video, scroll down for the video.

Measurements in inches:

Mossy Meadow, 3@ 2 3/8 x 2 3/8, 3@ 2 3/8 x4 7/8 
Festive Farmhouse DSP, Plaid DSP, 2@ 2 1/4 x 2 1/4, 1@ 2 1/4 x4 3/4 
Festive Farmhouse DSP, Wood DSP, 1@ 2 1/4 x2 1/4, 2@ 2 1/4 x 4 3/4 
Gray Granite, 8 1/4 x 8 1/4 
Cherry Cobbler, 8 1/2 x 8 1/2 
Whisper White, 9 x 9

Very Vanilla Cotton Twine, 9”
Cherry Cobbler Cotton Twine 8”
Striped Burlap Trim, 3”


Sled (Alpine Adventure stamp set) and Deer (Dashing Deer stamp set) stamped in Early Espresso on Very Vanilla and cut out with their dies.

Presents (Festive Farmhouse DSP), 1@ 3/4 x 3/4, 1@ 1/2 x 1/2, 1@ 3/4 x 1 1/4. 
Alpine Sports Dies, 1 Gold Foil bow, 1 Mossy Meadow bow.


Detailed Deer Dies, flowers, 4 in Daffodil Delight, 1 in Cherry Cobbler (one here, two on the wreath, one on the tree, and one on a present).
Pretty Pines Dies, pine boughs in Mossy Meadow, 2 of each size, 1 berry stem in Cherry Cobbler.
Whisper White embossed with Woodland Embossing Folder, 2” circle punch.


Christmas Bulb Builder Punch, 2 in Daffodil Delight, 2 in Cherry Cobbler, 1 in Mossy Meadow, 1 in White, 6 Gold Foil ends


Tree (Winter Wood stamp set), stamp it twice in Mossy Meadow on Very Vanilla, die cut (In the Woods dies) separately using the 2 tree dies, use dimensionals in between. Make a barrel for the tree, Crumb Cake 1 x 1 1/4, edges angled, embossed with Corrugated Embossing Folder

Sprig Punch, 3 punched in Mossy Meadow, 1 cut in half, add pearls.
Gray Granite circle, 1 3/4“ circle punch. 
Color the stamp with your Stampin' Write Markers.


Blizzard Die, 1 set of snowflakes in Whisper White, sprinkle them all around.

I've also decided that I love this project in the ash gray frame from Michael's. 
The frames I use are 9x9 Belmont shadow Box Frames.


And here's your how to assemble video!


Thanks so much for checking out my blog today! I hope it was helpful to your Christmas creating. Questions or comments, all are appreciated.

And as always, Stay Crafty!
Audra