Thursday, May 31, 2018

A Paper Pumpkin Thing Blog Hop, Manly Moments

Hi Crafty Friends!
Oh my, these Paper Pumpkin kits. They just keep getting better and better. I love this month's kit. I love it! The paper, the stickers, the tree die cuts. I'm very happy to be joining in on this month's Paper Pumpkin Thing Blog Hop.


Let's take a look at my alternative projects this month.


The shields with the trees make me think of all of our National Parks in the US. I love exploring parks. If fact, I've always wanted to be a park ranger. There's something about walking around in the woods that I just love. 
I made a really fun card and I decorated one of our super cute mini pizza boxes.


I had fun layering the trees on the shield. 
I'm thinking my Dad is going to like this card for Father's Day.

Our pizza boxes are so fun. They are food safe, but you can also put a gift card or other small gift inside too.


I hope I've inspired you to explore more with your Paper Pumpkin kit. Not a subscriber yet? Contact me for more info. Check out the rest of the blog hop for lots more ideas!


Wednesday, May 16, 2018

Dreaming of the Beach Framed Art Sampler

Hi Crafty Friends!

I am super excited to share this month's framed art sampler with you.
It's all about the beach.


I love everything about it! The colors, (a new one!) the images, and the feel of it.
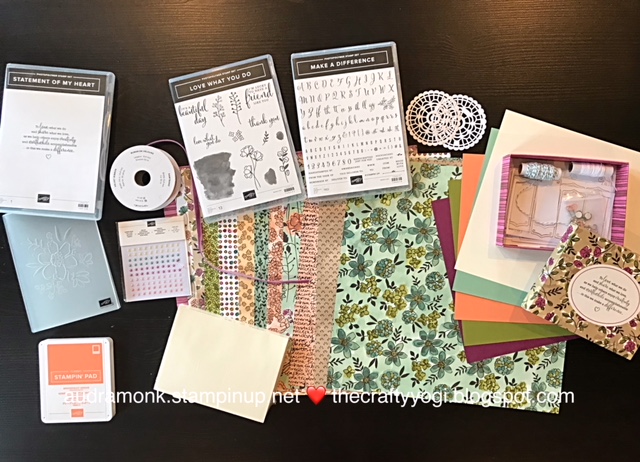
This project uses only five colors! Crumb Cake, Soft Sea Foam, Night of Navy, So Saffron, and Early Espresso.
Here are the measurements:

Crumb Cake, 9" x 9"
2 small squares: Whisper White, 2" x 2", Soft Sea Foam, 2 1/4" x 2 1/4", Night of Navy, 2 3/8" x 2 3/8"
2 medium rectangles: Whisper White and Wood Texture DSP, 2" x 4 1/2, Soft Sea Foam, 2 1/4" x 4 3/4", Night of Navy, 2 3/8" x 4 7/8"
Large rectangle: Whisper White, 2" x 7 1/8, Soft Sea Foam, 2 1/4" x 7 3/8", Night of Navy, 2 3/8" x 7 1/2"


The left top square is the sand, sea, and birds from the High Tide set. The middle square uses the Sea of Textures stamp set and the coordinating Under the Sea dies.


The vertical medium rectangle shows off the lovely lighthouse from High Tide, I used the Stamparatus to make stamping the light house easy. It's stamped in Crumb Cake and Night of Navy.


I love this middle panel! It's the feature of the project. It shows off the Sea of Textures stamp set and the Under the Sea framelits. There are so many fun details in this bundle.


The bottom panel is so peaceful. The sea is created by stamping the water stamp from High Tide lots of times in Night of Navy. Then I stamped and colored two sets of the sweet little boats from the Lilypad Lake set. Luckily there are framelits to cut out the boats. And the cute little sun die cut is in the same set.

I hope you like it as much as I do. It would be a great gift or great to keep for yourself.
I put it in a 9" x 9' shadow box frame from Michael's.

The new color and stamp sets will be available in our new Annual catalog starting June 1. Or join my team now and you can order them in your starter kit! Join my team before May 31 and I'll make a sampler for you for free! Frame not included.

I have catalogs! If you're local, get one in any class, or message me (audramonk@yahoo.com) to stop by and pick one up. I'll also have them (and lots of free fun) at my Open House event on June 10. Live farther away? If you've ordered from me in the last 6 months, I'll send you one free. Haven't ordered in a while? The catalog is still free, you just pay $7 for shipping.

Thanks for checking out my blog today.I hope that you will add samplers to your crafty time. They are so much fun. I love comments, so feel free to leave one. 
I'll close with some pics of the project all framed up.


Stay Crafty!
Audra


Monday, May 14, 2018

Color Revamp and Color Organization

Hi Crafty Friends!

I am so excited to share all the new Stampin' Up colors with you...but first, I've got to share a little about my last week. 
(Read on to see a video on the color revamp and info on how I store my paper and inks.)

My middle child graduated from college in Florida. So we went to Florida to celebrate and then move him home to Maryland while he looks for a job. (If you know anyone looking for a newly graduated mechanical engineer/CAD designer, let me know). And what an adventure it was.

 Here we are after the long graduation ceremony.

We took some fun graduation pics on the beach.

Then we went to Disney World with the Grands to celebrate.

Then we packed up his apartment and drove the U-Haul truck with the auto transport 830 miles.

Was I glad when we got home and it was over!!

While we were driving, my husband, who got to fly home so he could work, texted me a pic of my Stampin' Up boxes that had arrived.


I was pretty excited, but so tired so I didn't open them till Sunday. BUT oh my goodness, once I did...the new colors! Take a look at this video to see all of the lovely new colors.


Click HERE to see the video on YouTube.

Now that you've seen the new colors, I thought I'd share how I store my paper and inks. My craft area is in a corner of the main living level in an open concept house. A couple of years ago, I invested in a truly amazing desk from Stamp-n-Storage. I did a blog post a few years ago, you can see more HERE. Anyhow, I store my inks in the slots of the desk, and I store them kind of in rainbow order. By kind of, I mean rainbow-ish order, but not strict. I put the reds together, the blues together, greens together, etc. Having them in this order can help inspire me when I'm creating. I'll be swapping out the retiring colors with the new colors soon.


Paper is stored in magazine files on Ikea Billy shelves on the wall behind my seat. 
I store the paper by SU color families, Regals, Brights, Subtles, and Neutrals.


The three color families are on a shelf together. On the lower shelf, I have 12 x 12 mini catalog DSP and 12 x 12 color packs. Then the Neutrals collection and the In Colors.
The shelf to the right has my Whisper White, Very Vanilla, and Basic Black. And currently I have retiring paper next to that.


Thanks for checking out my blog today. I hoped you enjoyed it. A little bit of family, new colors, and some info on how I organize. As always, if you have questions, ask. I am happy to help.

Stay Crafty!
Audra


Friday, May 4, 2018

Share What You Love Bundles and Cards to Go

Hi Crafty Friends!

It truly has been a week for blogging, and I'm having lots of fun sharing with you. Today I wanted to talk more about the Share What You Love Early Release and my bonus offer.


This suite of products is amazing! The product line was designed for demonstrators, but is made for everyone to enjoy. There are stamp sets, paper, and embellishments. In fact, Stampin' Up put out a video where you can see the items close up and hear about the bundles. Have a look:


So as you see, there are three bundle options, each comes with free product. And I am offering a little bit extra. If you order a bundle with me, online on my website, audramonk.stampinup.net, using host code, H2QZXTVP by May 30, I will send you a free card kit in the mail. Cool, right? 

The card kit will include the paper and embellishments, as well as envelopes. You will get the supplies for two cards for each bundle. Bundle one will have two notecards, bundle two will include the two notecards and an additional two cards, and bundle three will include those four and additional two cards for 6 total. 
I will also email you a link to a video to help you stamp and assemble your projects.

This is my way of sharing what I love with you! 
Here's a sneak peek:


So contact me today with any questions and I will be glad to help. I'll end with some pics of other cards using the Share What You Love suite.


I hope you are inspired to create pretty things that you can share with those you love.

Stay Crafty!
Audra


Thursday, May 3, 2018

A Paper Pumpkin Thing Blog Hop, You Are My Anchor

Hi Crafty Friends!
It's time for A Paper Pumpkin Thing Blog Hop. And oh how I love this month's kit.


The colors, the cute nautical images, the twine. All such good stuff, and super cute if made up just as the directions tell us. Which I did for one, I'm giving it to my hairdresser with the tip inside. But, I don't use a lot of 3x3 cards, so I had other plans.

First up, I used the card stock and envelopes to make a full size card.


So easy and so cute. But what I'm really excited to share with you is a mini book. Let's talk a moment first. I've decided that this is the year that I help people get their pictures out of their phones. Seriously! We need to be able to look at the pictures and share them with others. I'll be doing many blog posts in the future with all kinds of tips and strategies. 
Today, let's talk about the power of the mini book.


I looked at the small envelopes and instantly saw a mini photo album. My husband and I went to one of our favorite beachy places at the beginning of April (even though it was still chilly). We walked and ate and rode bikes. It was wonderful. And I knew that I'd like to look at the pics and share them occasionally. A mini book is the perfect place! 
I've even started a basket to collect up the books so they're easy to find.


This table is in our sitting area and perfect for keeping the books at hand.

For this project, I needed to have mini pictures. You could make a collage in an app and print it out and then cut them apart, or you could get one of these cute little printers.


I got it on Amazon. It's so little! And it prints the cutest little pictures that have self adhesive backings! For some of my pics, I used the college feature in the Project Life App to put two pic on the same paper. I kept the decorating to a minimum. I made the book by attaching several envelope flaps together and then carefully sliding them all into one envelope. Then I attached the flap of this envelope to the back. Then I cut down the card stock to fit and attached it to each "page".


Let's take a look at the whole book.


Pretty cool!
Thank so much for stopping by today. 
Stay tuned over the next few months for more memory keeping ideas.

And remember, our Paper Pumpkin kits are on sale for new subscribers through May 10. Go to paperpumpkin.com use the code SAVEFIFTY0418 and choose me as your demo. You'll get your first two months at half price!


Enjoy the rest of the blog hop!


Wednesday, May 2, 2018

ICS Blog Hop, It's a Guy Thing, Magical Day

Hi Crafty Friends!
I know! Who can believe how many times I've blogged this week? It's crazy! But in a good way, I've got so many things to share. It's the first Wednesday of the month, so I am sharing my contribution to the Inspire, Create, Share Blog Hop.


This month's blog hop is all about the guys. We're sharing masculine projects, which mirrors what is going on in my Just Cards classes this month. Last month with our feminine class I used the Magical Day stamp set (oh how I love this set) and I decided to use it for this month too.


I think these cards are magical! They would be great for Father's Day, a birthday, or an anniversary.
Let's take a closer look at each.


The cool thing about these cards is that everything is the same, except for the figure, and that I flipped the DSP over. If you are planning to join us for class on the 16th or 25th let me know.

For more inspiration, click HERE or the arrow below to see what Terri has to share.


Want to place an order or join my team? Contact me, I'll be glad to help.
Stay Crafty!
Audra